Surya Namaskar (sun salutation)
There are numerous asanas in yoga but none of them have made an impact like Surya namaskar/sun salutation. It is the go-to exercise for almost any type of yoga practitioner. Also known as sun salutation, this exercise comprises of various asanas that strengthen and align the human body. This blog aims to provide an in-depth guide about how to perform it and the benefits associated with it.
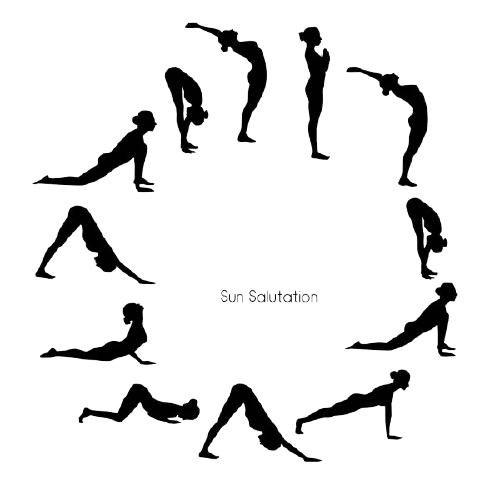
It’s crucial to understand the roots of Surya namaskar/sun salutation before we embark on a journey to conquer it. Historians believe that the concept of this exercise dates back to the 7th century in India. Also, it is greatly associated with Hatha yoga. (If you take a Hatha yoga class, then you will learn about it in detail!) The concept of sun salutation involves progressing from a standing position into upward facing dog pose and back to the initial position.
As the years progressed, the method of sun salutation branched out into various other forms. You may find one person practicing 12 asanas in Surya namaskar. Likewise, you might find another individual practicing 13 asanas. Fret not as the core ideology is the same, it’s only the method that’s different.
A. WARM-UP
Surya namaskar is a some-what rigorous exercise and you must warm-up before you do it. These short exercises will help you to maximize your performance and enable you to go through the movements easily.
1. Hips rotation
Place your hands on the hips and slowly move them in a circular motion. Make sure that you do not move your body. Simultaneously, concentrate on your breathing and do it at least 4-5 times.
2. Shoulders rotation
Slowly move your shoulder front and back in a circular motion. Slowly inhale and exhale while moving the shoulder. Do not rush while doing it. Shoulder mobility is an important aspect of Surya namaskar/sun salutation and this exercise promotes it.
3. Head rotation
Stand straight and rotate your head clockwise and anti-clockwise while closing your eyes. Do it slowly as some people might be prone to headaches. Like the other exercises, practice it 4-5 times.
B. STEPS IN SURYA NAMASKAR
1. Prayer pose (Pranamasana)
Place your yoga mat on the floor and stand at the edge by keeping your feet together. Balance your weight equally on both feet and relax your shoulders. Lift both arms from the sides while inhaling and place the hands in a prayer position while exhaling.
2. Raised arms pose (Hastauttanasana)
While inhaling, lift the arms and take it back. Make sure that you keep your biceps close to your ears. The motive behind this pose in Surya Namaskar/sun salutation is to stretch the body from the foot to the fingertips.
3. Hand to Foot pose (Hasta padasana)
Exhale and bend forward from your waist while maintaining an erect spine. Once you exhale completely, place your hands on the ground in proximity to your feet. Note: If you find it difficult to touch your feet, you can bend your knees a bit.)
4. Equestrian pose (Ashwa Sanchalanasana)
Inhale and push the right leg as back as possible and lock your right knee on the floor. Ensure that your left foot is between the palms.
5. Dandasna (Stick pose)
Place your body in a push-up position and slowly inhale and exhale. Keep your core tight and hold it for a while. This asana is comparatively easier than other poses in Surya namaskar/sun salutation.
6. Salute with eight points (Ashtanga Namaskara)
Carefully place the knees on the floor and exhale while doing it. Place the hips back slowly and put your chin and chest on the floor. In this exercise, it is mandatory that your both hands, knees, feet, chest, and chin touch the floor.
7. Cobra pose (Bhujangasana)
On the 7th step of Surya Namaskar, we do Cobra Pose or Bhujangasana. Here are the instructions: move forward and raise your chest similarly like a cobra. While inhaling, push the chest forward and while exhaling, try to push the navel down. Make sure that you are not applying extra force!
8. Mountain pose (Parvatasana)
As you exhale, bring the hips up and chest downwards. During this pose, the body resembles an upside-down letter ‘V’. At this point of Surya namaskar/sun salutation, you might feel a bit exhausted. If you experience difficulties, make sure to take a rest.
9. Equestrian pose (Ashwa Sanchalanasana)
Inhale and push the right leg as back as possible and lock your right knee on the floor. Ensure that your left foot is between the palms.
10. Hand to Foot pose (Hasta padasana)
Exhale and bend forward from your waist while maintaining an erect spine. Once you exhale completely, place your hands on the ground in proximity to your feet. Note: If you find it difficult to touch your feet, you can bend your knees a bit.)
11. Raised arms pose (Hastauttanasana)
While inhaling, lift the arms and take it back. Make sure that you keep your biceps close to your ears. The motive behind this pose in Surya Namaskar/sun salutations to stretch the body from the foot to the finger tips.
12. Tadasana
While exhaling, bring your hands down and straighten your body. Well done, you have completed this magnificent exercise.
C. BENEFITS
Some common perks of sun salutation are as follows:
- Improves flexibility
- Tones muscles
- Cardio training
- Aids in weight loss
- Helps in digestion
- Makes the body rejuvenated
D. PRECAUTIONS
Before you decide to practice Surya namaskar/sun salutation make sure that you get adequate warmup. Likewise, if you are suffering from any physical ailments, then you should refrain from doing this exercise. If you have breathing difficulty, then you should do this exercise with extreme caution. If you suffer from heart problems, then you should not do this exercise.
Thus, these are the basic checkpoints of Surya namaskar and once you master them, you can do this exercise smoothly.